
Purpose: Enables the installation of a retrofit trailer hitch (trailer/towbar retrofit).
Caution! The configuration in the control unit for motor 01 is not supported for certain models. In this case, the coding can be skipped. Control units that are not installed can also be skipped. Please note that certain coding steps must be performed based on the part numbers of the installed components (camera).
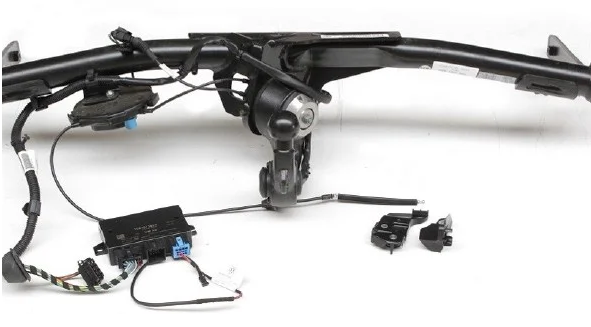
Warning!! Depending on the modules you have installed, there are up to 12 coding lines to complete here; most ECUs require a long coding process with a “trailer” that must be enabled!
Proceed :
1 – Engine off, ignition off, connect your official VAG-COM VCDS cable to
the computer, then plug the other end into your vehicle’s diagnostics socket.
2 – Switch on the ignition and run the VCDS program.
Line 1:
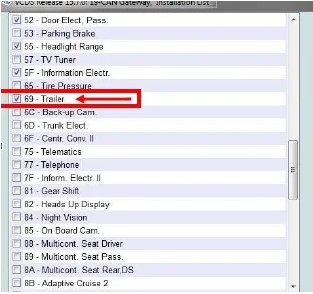
3 – Click “Select,” then click “19 – CAN Gateway.”
4 – Select “Installation List”
5 – Check the box next to “69 – Trailer” in the list
6 – Save coding
Line 2:
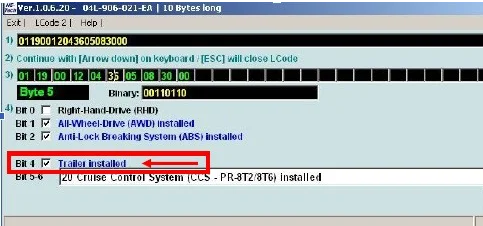
3 – Click on“Select”, then click on“01 – Motor“.
4 – Click on ” Coding – 07” then click on“Long Coding Helper“.
5 – Select byte “05“
. Then check bit “4“: “Trailer installed“
Line 3:
3 – Click “Select,” then click ““09 – Cent. Elect.”“.
4 – Click on“Coding – 07” then click on“Long Coding Helper“.
5 – Select byte “13“
Then check bit 4 “Hitch_ecu”
If you have an electric vehicle: Set Bit 4 of the “36” byte
Line 4:
3 – Click “Select,” then click “46 – Comfort Module.”
4 – Click on“Coding – 07” then click on“Long Coding Helper“.
5 – Select byte “14“
Then check bit 6 “Trailer monitoring”
Line 5:
3 – Click on“Select”, then click on“17 – Instruments“.
4 – Click on ” Coding – 07” then click on“Long Coding Helper“.
5 – Select byte “14“
Then check bit 5 “Trailer”
Line 6:
3 – Click on“Select” then click on “.13 – Auto Dist. Reg. “.
4 – Click “Security Access – 16,” then enter the code “14117” or “20103“
5 – Click ” Encoding – 07,” then click “Long Coding Helper“
6 – Select byte “03“
Then set Bit 3
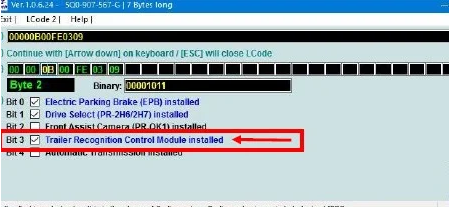
Line 7:
3 – Click “Select,” then click “74 – Chassis.”
4 – Click on ” Coding – 07” then click on“Long Coding Helper“.
5 – Select the “00” byte
Then set bit 7 (“trailer, 0 = not installed / 1 = installed”)
Line 8:
3 – Click “Select,” then click “3C – Lane Change.”
4 – Click on ” Coding – 07” then click on“Long Coding Helper“.
5 – Select the “00” byte
Then check bits 4-5 “10 with ECU for drawbar”
Line 9:
3 – Click “Select,” then click “6C – Rearview Camera.”
4 – Click on ” Coding – 07” then click on“Long Coding Helper“.
5 – Select byte “04“
Then set bit 0 (“equipment_ahk, installed”)
Line 10:
3 – Click on“Select” then click on “.6D – Trunk Electrical System “.
4 – Click on ” Coding – 07” then click on“Long Coding Helper“.
5 – Select byte “01“
Then set bit 7 (“trailer, 0 = not installed / 1 = installed”)
Line 11:
3 – Click on“Select” then click on “.A5 – Front, Sensors, Driver Assistance “.
4 – Click on“Security Access – 16” then enter the code“20103”.
5 – Click ” Encoding – 07,” then click “Long Coding Helper“
6 – Select the “11” byte
Then set bit 0 ( “AAG, 0 = not_coded / 1 = coded”)
Line 12:
3 – Click “Select,” then click “CF – Lane Change.”
4 – Click on ” Coding – 07,” then click on “Long Coding Helper“
5 – Select the byte “00“
Then check bits 0-5 “10 with ECU for drawbar”
Clear the error codes; if the Audi Pre Sense system still shows an error, restart the vehicle.
This post is also available in:
 Français (French)
