Purpose: Enables the rearview camera after it has been installed on the MMI (Low or High camera retrofit).
Procedure:
1 – With the engine off and the ignition off, connect your official VAG-COM VCDS cable to the computer, then plug the other end into your vehicle’s diagnostic port.
2 – Turn on the ignition, then launch the VCDS program.
Low Camera (Standard)
Line 1:
3 – Click on“Select” then click on“5F – Electr. information”.
4 – Click on“Security Access – 16” then enter the code“20103”.
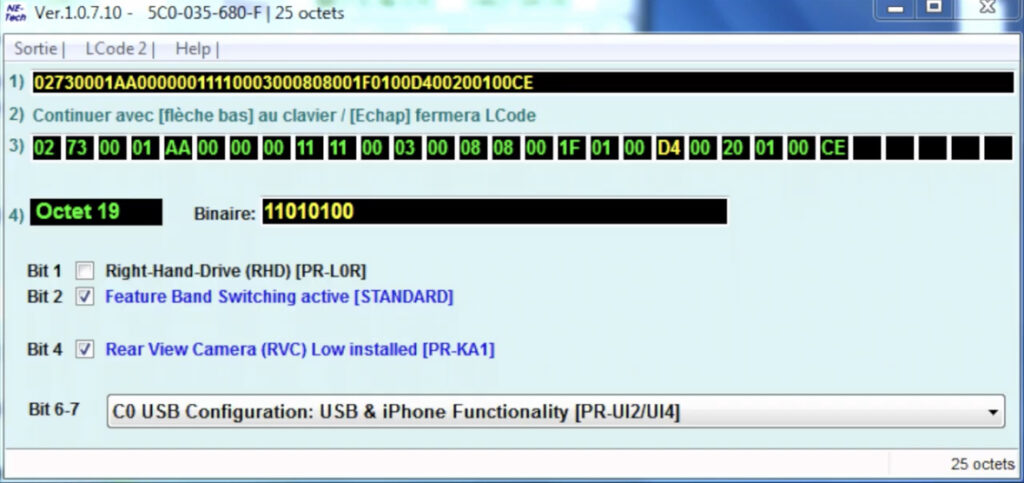
5 – Click on“Coding – 07” then click on“Long Coding Helper“.
6 – Select byte 19
. Then set bit 4 to “Rear View Camera (RVC) Low installed (PR-KA1).”
Line 2 (Optional, if parking assist is available) :
3 – Click “Select,” then click “10 – Parking Assistance.”
4 – Click on“Coding – 07” then click on“Long Coding Helper“.
5 – Select byte 02
. Then, for bits 4-5, select “10 Camera Type: Rear View Camera (RVC) installed.”
Hardware upgrade :
The camera’s video cable is connected to the infotainment control unit. It is installed in the glovebox.
The 2 pins of the reversing camera are used in the 12-pin quadlock (blue). Usable cable set: Part no. 000 979 009 E
Quadblock Assignment :
Pin 6 = video line
Pin 12 = shielding
High-Resolution Camera
Enabling the High-Resolution Rearview Camera (dynamic guide lines, various display modes).
Line 1:
3 – Click on“Select”, then click on“19 – CAN Gateway“.
4 – Select “Installation List”
5 – Tick:“6C – Rear View Camera” in the list
6 – Save coding
Line 2:
3 – Click “Select,” then click “6C – Rear view camera.”
4 – Click on “Coding – 07,” then click on “Long Coding Helper“
5 – Coding: 02 73 10 01 02 00 20 01 40 00 40
Line 3:
3 – Click on“Select” then click on“5F – Electr. information”.
4 – Click on“Security Access – 16” then enter the code“20103”.
5 – Click on“Coding – 07” then click on“Long Coding Helper“.
6 – Select byte 19
. Then clear bit 4.
Line 4:
3 – Click on“Select” then click on“5F – Electr. information”.
4 – Click on“Security Access – 16” then enter the code“20103”.
5 – Click on“Adaptation – 10”.
6 – On this page, at the very top, there is a drop-down menu.
In this drop-down menu, choose “Car Function List BAP Gen2 – VPS_0x0B“
7 – On this same page, there is a second drop-down menu at the bottom
of the page.
On this menu, choose the“active” value.
Line 5:
3 – Click on“Select” then click on“5F – Electr. information”.
4 – Click on“Security Access – 16” then enter the code“20103”.
5 – Click on“Adaptation – 10”.
6 – On this page, at the very top, there is a drop-down menu.
In this drop-down menu, choose “Car Function List BAP Gen2 – VPS_0x0B_msg_bus“
7 – On this same page, there is a second drop-down menu, but further down
.
From this menu, select the value “Comfort data bus“
Line 6 :
3 – Click “Select,” then click “10 – Parking Assistance.”
4 – Click on“Coding – 07” then click on“Long Coding Helper“.
5 – Select byte 02
. Then, for bits 4-5, select “10 Camera Type: Rear View Camera (RVC) installed.”
This post is also available in:
 Français (French)
