When should I make the basic settings?
As soon as the gearbox is drained for the DSG6, but also in the event of couplings, bugs, replacement of a gearbox part or the complete gearbox for the DSG 6 and 7.
This procedure allows you to reset your DSG gearbox and, depending on the case, even eliminate certain faults such as (accumulation of bugs, couplings, smoother shifting, less slippage).
This reset procedure will work not only on DSGs, but also on auto and tiptronic gearboxes on VW, Audi, Seat and Skoda.
This resets the Mecatronic software that manages gear changes and all the rest.
It’s advisable not to reset an automatic gearbox if it’s working perfectly.
Contents:
- Identify your DSG automatic gearbox
- Reset DSG 6 DQ250 02E
- Reset DSG 7 DQ200 0CW
- Reset DSG 7 DQ200 0AM
- Reset DSG 7 DQ500 / DQ381 / DQ380
- Reset DSG 7 DL501 0B5
-> VCDS: Check Launch Control number
-> VCDS: Unlock maximum speed (V-max)
-> VCDS: Reset tire pressure
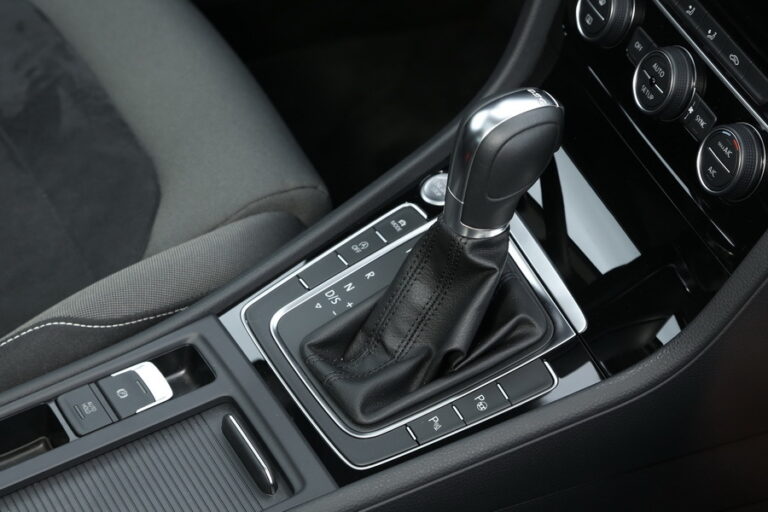
Identify your DSG automatic gearbox
In VCDS VAG-COM, Select DSG gearbox ECU, 02-Auto-Trans
We are now on the page presenting the DSG calculator.
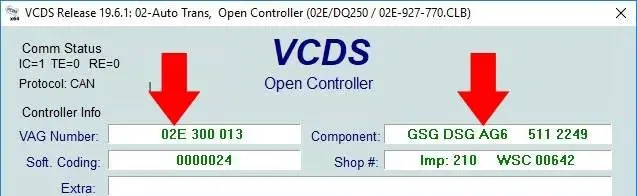
In the VAG Number box, we have: 02E, so it’s a DSG6 DQ250.
Reset DSG 6 DQ250 02E
Gearbox reset 6-speed DSG transmission with wet clutch, code-named DQ250, fitted to most VAG cars from 2003 to the present day.
Sometimes, some DSG6 DQ250 gearboxes have problems. We often talk about the Mecatronic, which needs replacing. However, here is the detailed procedure to follow with the VCDS to reset your DSG 6-speed dual-clutch automatic gearbox (DQ 250). This procedure is the official version followed by VW prior to the replacement of the Mechatronic for the gearbox known as DSG6. It applies to the VW GOLF MKV or MKVI, Scirocco, Tiguan, Seat Leon, Audi A3 8P, Skoda Octavia MKII and all derivatives of the 1K and 5K platforms. If you’ve come to this article, it’s likely that you’re experiencing shuddering or vibration, slow shifting or even a gear that won’t shift on your gearbox, and this procedure could help.
Please note that we strongly recommend that you read the entire tutorial before proceeding with the various steps. This DSG reset must be performed using a VAGCOM VCDS cable.
1 – Basic setting
Prerequisites:
- Fluid Temperature 30 … 100 ° C (86 … 210 ° F), see block measurement, group 019.
- Selector lever in position P
- Ignition ON
- Engine ON (idle) for one minute or more
- Brake pedal applied (hold throughout procedure)
- Accelerator pedal not working
NOTE: Be sure to perform the following steps in the order indicated, followed by the defined test drive.
Reset procedure DSG 6 DQ250 gearbox at VCDS VAG-COM
Start VCDS, then go to CONTROL MODULE,
Click on“Select” then click on“02 – Transmission” / “02 – Auto Trans”.
Click on“Paramètres de base – 04” / “Basic Settings – 04”.
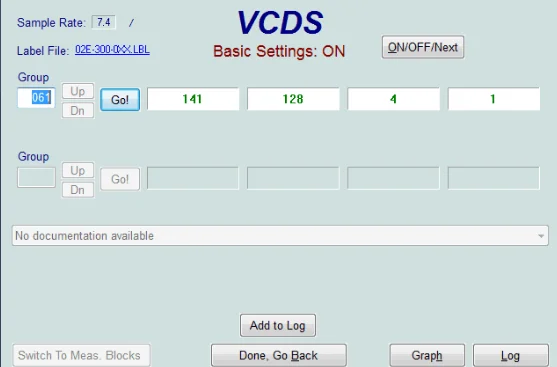
1.1 – Transmission tolerances (Calibration engaged)
- Group 061 [Go!]
- “BASIC SETTINGS: OFF
- ON/OFF/NEXT button – Wait until the digits stop moving and the BV stops making noise.
– Wait until Basic Settings has changed to ON and all numbers have stopped moving. - This can take up to a minute [Back] Switch off the ignition, wait 10 seconds and then switch it on again.
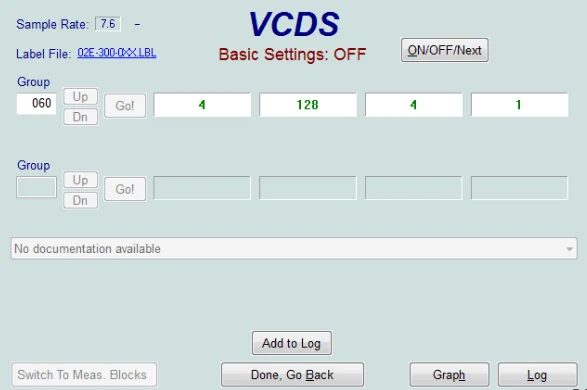
1.2 – Transmission tolerances (Synch. Point. Mesure)
- Group 060 [Go!]
- “BASIC SETTINGS: OFF
- ON/OFF/NEXT button
- Wait until the numbers stop moving and the BV will stop making noise.
- Wait until Basic Settings has changed to ON and all numbers have stopped moving.[ Back ] Switch off the ignition, wait 10 seconds and switch it on again.
1.3 – Clutch adaptation
- Control module Software Version <0800:Group 062 [Go!] Activate basic setting. [ON / OFF / Next]
- Control software module version> = 0800:Group 067 [Go!] Activate basic setting. [ON / OFF / Next]
[ Back ] Switch off the ignition, wait 10 seconds and switch it on again.
1.4 – Reset values (clutch safety function)
- Group 068 [Go!] Activate basic setting. [ON / OFF / Next]
[ Return] Switch off ignition, wait 10 seconds and switch on again.
1.5 – Reset values (Pressure adjustment)
- Group 065 [Go!] Activate basic setting. [ON / OFF / Next]
[ Return] Switch off, wait 10 seconds and switch on again.
1.6 – Reset values (Paddle installation handwheel)
- Group 063 [Go!] Activate basic setting. [ON / OFF / Next]
[ Return] Switch off, wait 10 seconds and switch on again.
1.7 – Reset values (ESP & Tip cruise control installation)
- Group 069 [Go!] Activate basic setting. [ON / OFF / Next]
[ Return] Switch off, wait 10 seconds and switch on again. - [Error codes – 02]. Check and clear fault codes after successful test
[Close Controller- 06] Perform the defined reader test.
2 – Special procedures
2.1 – Road test :
- Suggested road test after successful replacement of mechatronics or basic adjustment. Prerequisites:
– Fluid temperature 30 … 100 ° C (86 … 210 ° F), see block measurement, group 019.
– Do not use cruise control.
Road test procedure :
- Tiptronic mode selector remains stationary until 6th gear.
- While doing so, be sure to drive in 3 or 5 approx. 5 minutes and also in 4 or 6, approx. . 5 minutes.
- Motor speed at all speeds is 1200 -. 3500 RPM (for clutch calibration)
- Perform hard braking followed by full acceleration. NOTE: If the test drive cannot be performed in the recommended manner or time, the remaining adaptations will be performed automatically during normal driving.
2.1.1 – Special notes
- Some modules do not require the use if the [ON / OFF / NEXT] button. If an error is displayed after clicking the button, or the status of the basic parameters does not switch to Sur, the selected group and procedure finishes on its own.
- It is normal for the transmission to make noise as tolerances are adjusted. Do not leave or interrupt the basic settings sequence prematurely if you hear rattling noises.
– Customers with TDI have reported that a rev range of 2000-2500 rpm is sufficient.
Reset DSG 7 DQ200 0CW
Reset of the DQ200 DSG 7 dry sump gearbox, available in 2 versions. For version 0CW (Golf 7, Passat B8 …)
- Take the car for a drive – it must be warm enough to perform the operation. Once parked in P mode, switch off the engine, set the handbrake and leave the ignition on.
- Connect the adapter to the OBD2 socket, then to the PC, then launch VCDS.
- Click on Select calculator.
- Click on 02-Auto box. (Check your version in the VAG number box)
- Then click on Default codes – 02. There must be no error codes on the box to perform the operation! Then close the error codes window.
- Then click on Basic settings – 04 to open a specific diagnostic window.
- Select menu IDE02903 – Basic box settings.

- Then click on Display Measurement Groups, a window appears.
- In this window, scroll down and click on the indications with the code names IDE02825, IDE02825 and IDE02826. These counters will let us know the state of the box and the treatment process during the operation.
- Then press the brake pedal throughout the operation, and click Go! to start the procedure. The indicator changes to “In progress…”.
- During the procedure, you’ll hear noises in the gearbox and the 3 counters will display different values until they reach 0 – 0 – 4. At this point, while still holding the brake, start the car.
- The numbers on the 3 counters keep moving and the box keeps making noise until the numbers read 0 – 0 – 254.
- VCDS indicates that the operation has “Finished correctly”. Simply click on Stop and then on End, Back to close the window.
- Then switch off the engine and ignition for 10 seconds.
- The operation is over!
Once the gearbox has been set to its basic configuration, it needs to readjust and “relearn” its settings. This process takes place automatically as you drive, but it is possible to accompany it to optimize this readaptation. Here’s how you can help it readjust.
To start, you need to put the lever in “D” and drive off, making sure that the gearbox shifts and holds each gear for at least 5 seconds before shifting up or down. It is important to repeat this operation for all gears.
Then activate Manual mode and proceed in the same way, shifting up and down through the gears in “normal” driving mode, at moderate revs, without heavy acceleration or sudden braking.
We recommend driving for around 15 minutes in odd gears (5 and 7) between 2000 and 4000 rpm, then repeating the operation in even gears (4 and 6).
When you’re back on the road, reset the “D” position and continue driving. You’ll notice a marked improvement in the gearbox’s behavior, especially at low speeds and in traffic circles. Where the gearbox used to shift into third gear too early, causing jerking, it now maintains revs in second gear for longer, eliminating “chatter” altogether. The gearbox now seems much smoother and works perfectly.
Reset DSG 7 DQ200 0AM
Reset of the DQ200 DSG 7 dry sump gearbox, available in 2 versions. The 0AM version is generally paired with 1.2 TFSI/TSI, 1.4 TFSI/TSI, 1.8 TFSI/TSI, 1.6 TDI, 2.0 TDI (110 hp) engines and Skoda models: Fabia, Octavia, VW: Polo, Golf, Jetta, Coccinelle, Audi: A1, A3 Seat: Ibiza, Leon.
Resetting your BVA must be followed by a test run to complete the calibration procedure. This run is mandatory. After the first run, you’ll notice that your BVA behaves strangely and non-fluently, with jerking. This is normal, as the purpose of the test run is to complete the calibration in real-life conditions.
Prerequisites:
No fault codes stored
Temperature 30°C – 60°C. Measuring block value for G510 can be found in group 011.1
Selector lever in P
Ignition ON, engine OFF
Parking brake on
Brake pedal on (hold for entire procedure)
Accelerator pedal not operated
NOTE: Be sure to perform the following steps in the sequence shown, followed by the defined test drive.
Reset to zero
1. Connect your computer to your vehicle and start VCDS.
2.“Select
3. “02 – Auto Trans– Check that your BVA model is DQ200-0AM by reading the various text fields that appear.
4. “02 – Auto Trans > Fault Codes” – Check your BVA for faults.
5.“02 – Auto Trans > Measure Blocks” – Enter group 011 then click on “Go”. Check that temperatures displayed are between 30 and 60 degrees celcius.
6.“02 – Auto Trans > Basic parameters – 04” – Enter group 060 then click on “Go”. At this point, the calibration procedure will start. Hold down the brake without interruption. You will hear clicking noises coming from your BVA – this is normal. The numbers in the boxes will change for about a minute.
7. When the numbers displayed are 4 – 0 – 0: start your engine. The procedure continues automatically and the numbers displayed will continue to change.
8. When the numbers displayed are 254 – 0 – 0: the procedure is complete. If another combination is permanently displayed, the procedure has not been completed correctly.
Information:
If 4 | 0 | 0 is not displayed DO NOT start the engine, something is wrong with the procedure or the transmission.
It’s normal for the transmission to make noise as tolerances adjust. Do not close or terminate the Basic Settings sequence prematurely if you hear blistering noises. This is similar to the 2-speed DSE 02E.
Live data should display 254 | 0 | 0 to confirm successful basic settings after 3 to 6 minutes.
254 | 7 | 0 alone indicates procedure in progress or blocked and 255 | 0 | 0 indicates that basic parameters have been interrupted or failed.
9. Switch off your engine and turn off the ignition.
10. Wait about 10 seconds.
11. Start your engine and clear any fault codes in the ECUs “01 – Engine > Fault Codes” and “02 – Auto Trans > Fault Codes”.
12. Exit VCDS and disconnect the cable.
13. You must then drive your vehicle along a test track. This will enable the BVA to adapt to real-life conditions.
Test course (mandatory)
The idea is to test the gearbox’s different use cases so that it can adapt and memorize them. When you first drive your car, you’ll notice that the clutch is quite rough – this is normal.
After resetting your BVA, consider it to be in a fragile state until calibration is complete. So don’t rough up your BVA until it has adapted properly.
Do not use the cruise control during the test run!
Keep in mind that the following steps are not a sequence to be followed in a precise order, the idea is to be able to validate all these steps during the test run, moving gradually from the quietest to the most brutal stages, to avoid premature wear and tear on the mechanics. The test run is not intended to be carried out with extreme precision, but simply to make the vehicle pleasant to drive as quickly as possible (and not after days of driving).
1. Drive calmly for a few minutes, so as not to jar your clutch at first. Shift gears slowly, if possible up to 7th, and stop by downshifting slowly: anticipate stops.
2. In an isolated area, when driving at a moderate speed (e.g. 40 km/h), brake hard enough to simulate an unexpected stop such as a right of way or traffic circle. But not necessarily an emergency stop: don’t burn your brakes!
3. After making an unscheduled stop (sudden braking), drive off immediately, accelerating moderately in order to “stress” the BVA a little by giving it contradictory commands (which happens regularly in town).
4. Brake hard, then once stationary, shift into reverse and accelerate moderately (not too slowly either). Then brake completely and move backwards again for a few metres, accelerating moderately.
5. Then try driving at a constant speed in different gears (4, 5, 6, 7) for a few minutes in each of them. Ideally, find a road at 90 km/h with little traffic, so as not to disturb others. At low speeds, a busy area can also do the trick on a Sunday. Don’t exceed the speed limits!
6. Drive normally, trying to use all the gears between 4 and 7 in Tiptronic mode (BVA in manual mode) using the steering wheel paddles or gearshift lever for a few minutes in total. No sporty driving!
7. Step to be carried out after all the others, once your BVA has become smooth again: on an open road outside town, when you’re at a standstill or at low speed, suddenly depress the accelerator pedal halfway so that your engine hums a little (but not all the way!) up to 7th gear if possible. Don’t exceed speed limits!
8. Step to be carried out after all the others, once your BVA has become smooth again: on an open road outside town, when you’re at a standstill or at low speed, suddenly press the accelerator pedal down hard (kick-down) so that your engine accelerates to the maximum. There’s no need to reach 7th gear – don’t exceed the speed limits! The idea is to confront the BVA with maximum acceleration.
After this run, you’ll notice that your BVA has become smooth again, and that it makes little or no pan noise.
Reset DSG 7 DQ500 / DQ381 / DQ380
Reset of the 7-speed DSG wet-clutch transmission code-named DQ500, Volkswagen Transporter, Tiguan Audi Q3, TTRS, RS3 or DQ381 / DQ380 for VW Golf 7 GTI / GTD / R / Arteon / Audi S3 8V (2.0 TDI / 2.0 TSI TFSI engine)
Prerequisites :
Transmission fluid level is correct and temperature is above 15°C (DO NOT continue if temperature is too low)
No error codes other than P175F 00 [047] – Basic settings not made
Advanced measurement values = [Control module temperature]
Selector lever in [P]
Engine idling, do not depress accelerator pedal
Parking brake and foot brake applied throughout procedure
Important!
All prerequisites must be met
The brake pedal must be depressed throughout the procedure
Not all transmission controllers support this basic settings function.
Basic settings procedure
[Select] – [02 – Transmission]
[Basic settings – UDS]
Select [Basic transmission settings] (Don’t press [Go!] yet!).
Select the following [Display measurement data] values:
[Engine speed]
[Abort code basic setting main status]
[Basic setting status]
[Basic setting data status for clutch]
[Basic setting data status; gear selector]
[Abort code basic setting substatus]
Then press [Go!]
The screen should display [Running].
Wait until [Done correctly]
Press [Done, Back]
Check error codes.
Close controller
Important! Switch the ignition off and on again!
(If you fail to complete this last step, you will not be able to select any reports!)
Special remarks
This basic setting procedure should also work for the following models: 0BT, 0BH, 0DE, 0GC (ref.: VAG DQ380, DQ381, DQ500 direct-change gearboxes).
During the basic tuning procedure, the transmission may make loud shifting noises, which is normal.
If the basic settings fail, please send an e-mail to Ross-Tech with a complete automatic analysis and the information found in [Display measurement data] at the time of failure.
Basic settings may not be correct if:
Liquid temperature becomes too high.
The brake is released.
Reset DSG 7 DL501 0B5
Reset of the 7-speed DSG gearbox with wet clutch (Audi S-tronic) code name DL501, version 0B5, Audi A4, A5, A6, A7, Q5, S4, RS4, S5, RS5 and S6 after 2008
Prerequisites:
- Correct transmission fluid level
- Transmission fluid temperature between 40 and 100 C (one user reports that it should be below 60 C)
- However, it is strongly recommended to check/clear all powertrain controller faults.
- Key on, Disable motor
- P selection lever
The 3 basic setting operations must be completed in the order shown below.
[Select]
[02 – Auto Trans]
[Basic settings – 04]
Select a deletion counter for start and stop processes
Go to Basic Parameter activation.
After Finished Correctly or Not Running, click on [Stop].
(Done, resume)
- Note: Counter clearing for start/stop processes may not be supported on vehicles without start/stop (code P 7L6). If this group results in an error message, skip it and go on to the next steps.
Start the engine and leave the selector lever in Park
[Basic settings – 04]
Clutch valve calibration Go to Basic parameter activation.
After Finished Correctly result, click on [Stop].
Distance sensorcalibration
Go to Basic Parameter activation.
Transmission turpanic noises are normal
After the Finished Correctly result, click on [Stop].
(Done, resume)
Switch off the ignition, wait 10 seconds and then switch it on again.
[Fault codes – 02]
Check and clear fault codes
[Closing regulator, return – 06]
Carry out a test drive and check the error codes again afterwards.
Special notes
- Numerous Audi TPI/TSBs exist for 0B5 transmission problems. While a majority are flash update related, some are hardware related (“printed circuit boards” Internal wiring harness) instead. In October 2015, the list below might be useful, but Official Factory Repair Information should be used to confirm whether they apply to the vehicle in question:
- NAR (North American) Market:
- 2027363
- 2039267
- 2030447
- 2032211
- RoW (Rest of the World) market:
- 2022497
- 2027286
- 2027291
- 2039534
- 2027286
- 2036201
- NAR (North American) Market:
- Problems with LDR, water ingress and corrosion on the 0B5 mechatronic connector are not uncommon. When it comes to a MTC that won’t communicate at all -or- is full of random DTC codes such as P1893, P1894, P1892, P1890, U0100, U0146, P2850, U0100, U0212 and U0401
- 0B5 mechatronic replacements may require the dealer network to match even if there are no “Locked” or “Component Protection” error codes.
- 8K5 927 156 R
- When the P17CA is stored in a new mechatronic unit that does NOT have component protection DTCs, the Basic Settings procedure can resolve it based on feedback.